Sunday, December 30, 2012

MORE Graphic 45 Papers

Hello again.  Well, I just finished taking pics of the remainder of the year using A Place in Time by Graphic 45.  Just an FYI -- there are a LOT of pictures in this post, so you  might want to grab a cuppa before you start.

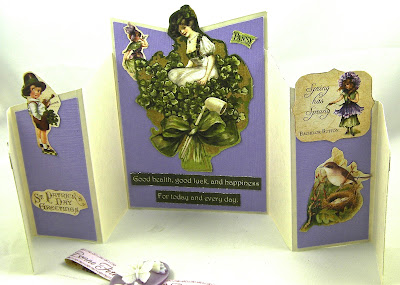
For the first picture, I'm showing the missing March project that I had left at the store.  And here it is...  This is actually two Z-fold cards placed together.


March opened up -- note how the center back looks by putting the two "Z" folds together.


This next one is June and happens to be a favorite of mine.  Just something about the softness of the colors -- oh heck, I just love the whole premise of June wedding!


I added some embossed cream cardstock to enhance these luscious colors.


This is actually a book using pleated card stock in the center to contain the pages.


Last page of June.


On to summer!  Here's July.  I'm not normally a huge fan of patriotic stuff (is that blasphemy?) -- don't get me wrong, I love my country, but sometimes the red, white and blue are so overdone.  I love what Graphic 45 did with their colors and choices of images.  So, this turned out to be a particularly fun one to do.  It really challenged me to create a very different folded card as you will see by the following open pages.  This card has a belly band as did some of my others in a previous post.


Opened to the first page...

Opened to the second page...


Then flipped up to reveal more fantastic images!


Now this next one, August, is so totally different that I even surprised myself.  Keep in mind that this folds completely flat and is still an A2 size card (as are all of them except September).

This is either the front or the back -- it makes no difference as you will see.


Here's one side...


The reverse side...


The last short side...


Here's a view of the card looking down onto it.  I don't know what to call this fold, but it is one of the most fun folds I've used in a long time.  I simply put two of these together to form one complete card.


And here's September -- this fits in a #10 envelope.


And here's September opened.  I created little paper bag pockets out of actual paper bags and deckled the tops.  I then used existing tags on the sheet and inserted them in the bags.  Believe it or not, I used almost every image on this particular sheet.  


And here's November.  I made all separate pages and attached it with an "O" ring and hung a tag off the side (not too visible).

Inside first page...


Inside second page...


And last, but not least, Christmas!  Once again I created the book style using an accordion folded center to hold the pages (same as June, but different orientation)...


Inside first page...

Inside second page...


Inside third page.


Well, that's all they wrote, folks!  I don't know when I enjoyed doing something this much.  Part of it was because I FINALLY had some time to just sit and create without pressure for a deadline or a blog post.  I hope you've enjoyed seeing these as much as I've enjoyed showing them to you.

Ciao for now!

Ciao Bella! 


Thursday, December 27, 2012

Graphic 45 Papers


This company has such gorgeous papers.  Their newest selection "A Place in Time" really called out to me.  I HAD to have each and every month.  I decided to try and create a different folded card for each month -- I almost made it.  I came up with 10 different folds.  I'd like to show you what I've created for January, February, April and May (March is at the store - Kept Creations).  These are so addictive once you start on them!  Kim at Kept Creations loved them so we've decided to offer a "Card of the Month" using just these papers.  Here's a sneak peek...

January showing a short "Z" fold and card is banded:


One view opened...


Second view opened.

February with normal "Z" fold:


Inside front view of February:


Outside back view of February (I actually ran out of images to place on this one):


Next is April using a double easel and banded again:


April opened full view with both easels:


April showing the inside of the closest easel:


May using a standard sidestep:


I will take pics of March and June thru December and post them at a later date.  

You have no idea how much fun these were to make.  It's like putting a puzzle together -- you need to plan exactly what pieces you want to place on the card without cutting into another piece that you also want to use.  

Well, I hope you've enjoyed this teaser and I hope we get a lot of sign ups for the Card of the Month at Kept.  I look forward to seeing you all there!

Ciao for now!

Ciao Bella! 


Sunday, December 9, 2012

A little gift...

In a previous post I had made a box and decorated it with Washi flowers.  Well, here's the same box, but done up for the holidays.  I filled the box with six cards and envelopes to give to my gifted hairdresser.  Using my favorite mirror cardstock and a great poinsettia die from Cottage Cutz, I created the top for the box.  The little corner adorners are from Cheery Lynn -- I absolutely love this set!


And here's a close-up of the corner...


Well, I guess I have to get back to making some Christmas cards!  Enjoy and feel free to leave a comment.

Ciao for now!

Ciao Bella! 


Wednesday, November 28, 2012

What time is it!...It's Washi Tape time!


I'm sooo sorry, but I just enjoy doing different things with this tape.  I find it versatile and gives me the ability to create a very quick card and "quick" is not usually found in my personal dictionary as we all know!

I'm rather fond of black and white and now you can purchase Washi Tape in sheets!  Yep!  So I didn't have to do any piecing of tape with this card.  Using a long border die and combining it with Inchie squares and rolled roses, this is what I came up with.  I'm going to be doing a picture frame using the same sheet of Washi paper and I'll post that down the road.


The inspiration for this next card is one of my favorite Impression Obsession stamp backgrounds which I stamped in white on navy card stock.  I placed a band of border punched white card stock across the center front of the card and then created a bow using my plastic bag technique and my Craft-Dee BowZ.

I also have a few Christmas cards for you today.  This first one was inspired by the unusual combo of pink and white snowflake Washi tape, so I used it in combination with a new Penny Black set and mounted it on a piece of gold mirror card stock.


Now the next two I did in brown/gold and smoky black/silver.  What?  Now why in the world would someone use browns and blacks for Christmas?  Take a peek and see what you think.


These were, of course, inspired by the silver and gold glitter Washi tape and my favorite mirror card stock.  The die is from Poppy Stamps.   Wouldn't these make great masculine cards for the holidays?

Well, I hope I've inspired you some more to get out there and try this great medium.

That's it for today -- ciao for now!

Ciao Bella! 


Monday, November 26, 2012

Madly in love with Graphic 45 paper!

Have you seen their newest line, Place in Time?  DON'T!!  You'll be sorry!  I created this card just because I loved the colors and the whimsy and antiquity of these papers.  I don't know what type of fold this is as I reproduced it from a kit that a friend purchased somewhere.  So while I can't take credit for the folds, I can take credit for the creativity involved using these papers.  I'll also include a picture of this card in the open position so that you get the idea. It has a belly band to keep the card closed and I added this embellishment for extra interest.


What's so terrific about this line is that it's for each month of the year (oh boy!).  So, of course, I purchased each month!  This card kept me busy for several hours believe it or not as there are so many elements on each page, that you want to pick and choose where and how you want your placement.

I think I'll do January next and perhaps I'll start doing a post a month with the results.  You may want to pick up some of this luscious paper and "play" along with me (LOL!).

That's it and ciao for now!

Ciao Bella! 

Tuesday, November 20, 2012

An ornament...card...??

I'm getting a bit behind again with my posting so I thought I'd share this card that I taught  (or one very similar) at Kept Creations last week.  This is made using the rosette technique and sandwiching it between two pieces of cardstock.


Here's a side view...

I used a series of Spellbinder dies for the main circle and rim of the circle.  I punched a bunch of snowflakes with a Martha Stewart punch and embossed the front of the card with the new Spellbinder M-Bossibilities.  Rounding the corners softened the effect.  You can see that I added a loop so that this can be hung on the Christmas tree.  If you'll skip on over to my Craft-Dee BowZ blog, you'll see some different samples of this same card, but they will be offset with a pretty bow (of course!).

I hope this has inspired you to create a little out of the box.  Ciao for now!


Ciao Bella! 

Thursday, November 15, 2012

I think I'm getting the hang of this!

I'm talking about simple cards.  I find that I have a tendency to either over think a card or just plain add more to it.  I envy the artists out there who can master a simple clean card that makes me go "oooh!  I love that.  Why didn't I think of that?"

So, here are two cards (identical in layout) that are simple, quick to put together and yet catch the eye.  See what you think.


(First, I apologize for my photo  being a tiny blurry here -- sorry.)  Both cards were done using Washi tape (yes, that glitter is Washi tape -- love it!!).    And here's the second one also using Washi tape.


The same layout, but different colors and accents.  Tell me what you think -- did I make it simple?  LOL!  Thanks for any comments you may leave.

Ciao for now!

Ciao Bella! 


Tuesday, November 13, 2012

Silver and blue...

As I may have mentioned before, I love mirror card stock.  I also love Glitter Ritz and easel cards.   Sooo! Why not put them all together for this winter card?


A very easy card to create with the right dies from Memory Box.  I utilized all the negative pieces that popped from the die and created a mosaic strip at the bottom of the card for the easel to stand against. Once the negative pieces were in place, I dusted the strip with Glitter Ritz and rubbed it in.   I also used a Cuttlebug embossing folder for the background beneath the dies.  The corners were created using a fancy corner punch and glued into place.

That's it for today!  Feel free to comment or ask questions!

Ciao for now!

Ciao Bella! 


Wednesday, November 7, 2012

Inspiration...

With the wind howling out there today, it sounds and feels like we should be in 6 feet of snow.  But luckily, it's just the wind and rain!  So since the wind put me in the mood, here's a card I created for a class at Kept Creations in early December.


I used some new product (for me) on this card.  I started with a cream based card and added a piece of handmade gold embossed paper.  The paper was a bit dull in color so I boosted it with a spritz of Goosebumps and a smattering of gold glitter.  Next up was a labels die by Spellbinders and a sentiment by Papertrey Ink.  The pinecone was made using the Punch Bunch pear punch and the leaves were punched from a Martha Stewart punch.  I then dusted the pinecone with the new Flowersoft Glitter Frosting (Hint of Green).  The final touch was some gold ball embellishments.

So, I hope this is the closest I come to "snow" for a very long time, but I just thought you might enjoy a Christmas card to get you in the mood.

Ciao for now!

Ciao Bella!

Tuesday, October 30, 2012

Steampunk published!

Wow!  I am so honored that Just Cards has published my very FIRST attempt at Steampunk!  That was the post where I thought I'd missed it by a mile.  Evidently Just Cards did not agree with me.


And to refresh your memory, here's my project... (sorry the exposure is a bit off)


A few close-ups...


I love the whole Steampunk look, but find that I have to labor over it.  It's not my genre, but perhaps if I play with it more, I could find myself totally immersed in this media.

Ciao for now!

Ciao Bella!