Friday, July 29, 2011

Playing catch up!

Hi there!  Sorry, but I've been a wee bit busy catching up on life after CHA.  I think I'm ready for the next round!  I had a class and a demo to do this past week and another demo tomorrow in RI, so for me, this is catching up!

First, let me tell you that I was published in the new issue of Vamp Stamp News.  They were looking for techniques using mostly solid stamps.  Mine is on page 11 in the center if you care to charge out the door looking for an issue (LOL).  Actually, if you click on the link above, you'll see my card in the "blinker" at the right hand side of their main page.  It was fun to do.

I thought I'd share a few more pics from CHA that you might enjoy.  It will be a hodgepodge of different vendors and I'll try and be as accurate as I can so that you can do some web searching on your own.

First, let's start off with more Spellbinders.  These are really cute (and big dies!).


Then we're off to Heartfelt Creations.  Oh, boy!  They had some unbelievable "stuff" there!  This little basket is their newest die and you can actually make a stand-alone basket with it.


And then there's some of Heartfelt's  flower dies


Then these last few are from Just Rite.  Oh, Lordy, I could have spent the day in their booth!  


Well, that's it for CHA!  Hope some of these cards teased the creativity in you.  

I'll try and be back a lot sooner with some other stuff I have going on here.  Until then, ciao for now!

Ciao Bella!


Friday, July 22, 2011

Back from CHA!

Hey bloggers,  I'm baaaack!  And glad to be home -- it's true what they say -- there's no place like home.  I really hate living out of suitcases.  But aside from that, we had a grand time, great flight, wonderful company and soooo much to look at.  It's a good thing they didn't plant columns in strategic places in the convention center because I KNOW I would have slammed head on into them with all the gawking I was doing.

So let me give you a rundown of some things that went on.  This may be a long post, but I'll try and incorporate pictures that I think you will enjoy.  I took soooo many pictures!  I'll start off with a picture of the convention center in Rosemont (outside Chicago), IL so you'll feel like you are there with me.  We stayed right across the street from the convention center so it was an easy walk each day.  But the heat!!  It was 99 degrees several days - that cloying, heavy, yucky kind of weather that left you gasping for air.  So here's a picture of the convention center:  (you can click on any picture to enlarge it)


And a picture of the inside entrance.  Oh, were you expecting to see thousands of people?  I believe the next few pictures will give you an idea of how the economy has effected this industry.  You've all heard stories of the thousands of people, the crushing crowds, the elbowing thru the aisles, the waits to do make & takes.  Well, these next few pictures will tell it all.


This is the entrance into the show.  Hello!  Anybody home? 


A picture of the "thousands" of people crowding the aisles.


This will kill you -- My Minds Eye?  ONE person in the booth?  This was a little scary to see.  Nice comfy, come-on-in booth, though, don't you think?


Kim and Sue by the pink flamingo just inside the door.  Some of the decorations were over the top, but this caught my eye because I wanted to match it to Kim's hair!


You are most likely wondering what in the world is going on here?  We had gone to the Hilton for supper one night around 10pm and the temps were still in the mid 90's.  When Kim and I stepped out the door from the hotel, we got hit with the humidity and this is what happened to our glasses.  We couldn't see 2 inches in front of us.  We're holding hands and stumbling on the walkway laughing our heads off.    This had to be one of the funniest things the entire trip!

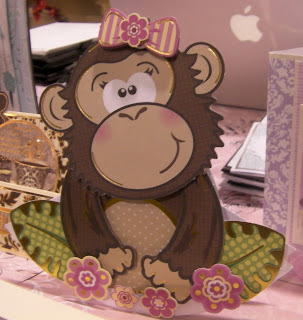
Okay, so on to a few sample cards.  I took so many pictures of card samples and was so inspired that I can't wait to get my hands on some new stuff!  These two are some cute boy images from Flower Soft.  They have their own stamp line starting as well.  


Okay , I guess you can tell these dresses are made of paper, specifically Bazzill.  Aren't they clever?


Move over Cricut!!  This is one phenomenal machine put out by eCrafts and is available now in retail stores.  The price point is only $299 and (read this carefully) IT NEEDS NO MAT OR TOOLS to cut and remove your images!!!!  It has an optional tray that you can put an entire roll of vinyl on and the cutting width is 12", but it's as long as the (huge) roll of vinyl (not shown in this picture).  And the best thing is NO CARTRIDGES to buy!  You can download from their website.   These are the same people who make the new eBosser which is basically an electric Cuttlebug (oh, boy!).

No show would be complete without a tease from Spellbinders...
Some new flower dies!  These are actually for the Grand Calibur.
Will you check out these borders?!  They can be used in the Grand Calibur as well as your other die cut machines - you just don't achieve the length that the Grand Calibur allows (8-1/4 x 11), but who cares?  The samples I saw were to die (pardon) for!
I don't want to put you to sleep thru this post, so I'll sign off with a few pics from a few different stamp companies. 
La Blanche Stamps


Believe it or not, the above two samples are from the same company, Kan Ban.   Quite a dichotomy, aren't they?


This is just a tiny sampling of the many pictures I took.  So I'll sign off with a few poses of our crew as we were leaving Chicago.  Such adults, aren't they?


I'll be happy to answer any questions that this post may generate.  Feel free to comment!  Hugs to my traveling companions, Sue, Kim, Nancy and Dee (Terry left a day later than we did).

Ciao for now!
Ciao Bella!


Monday, July 4, 2011

It's Sew Easy.

I had never heard of Sew Easy until I attended a trade show earlier this year.  It caught my attention and thought perhaps this would be a fun tool to incorporate into our card making.  This tool has a handle and many different wheels or heads that can be changed out for different designs.  It also has a compartment inside the handle to house a large-eyed needle for sewing.  You can purchase one at the Scrapbook Cupboard.

So, what on earth has sewing got to do with card making?  Well, you be the judge.  Depending on what "design wheel" you use for your Sew Easy, you can create different edges for your cards.  Here's a picture of two cards that I'll be doing at the Scrapbook Cupboard on Thursday, July 14.  I got a little behind on my projects, so this is just going up now.  If you'd like to investigate this tool further, this is your opportunity.  It's fun and easy.  Just call the store and Bev will sign you up for the class.


The card to the left obviously is decorated using the scalloped design wheel and then stitched using some of their divine metallic fibers.  I mimicked the scalloping at the bottom using a Martha Stuart border punch.  Now the butterflies --- oh, my!  Those are by Cheery Lynn Designs and are just heaven to play with.  They come in two different sizes with all the detail work, plus 2 different sizes of the solid design.  Pull the card flap down, add some fake stitching, add the butterflies and you are done!

The second card was ultra simple by just stamping the flowers, edging the image piece using the same Martha Stuart border punch and then using the straight stitch design wheel I then used a classic backstitch in burgundy metallic thread.  This was all layered on silver metallic card stock.  The effect is rather lovely.  Just click on the image for a larger view.

So that's it for today.  Hope you liked it and will call the store to reserve your spot.

Ciao for now!

Ciao Bella!


Saturday, June 25, 2011

Here kitty, kitty!

Nope, I'm not talking about my sweet kitty, Gabby.  I'm talking about this great new die that I just got.  I just loved it when I saw it and for me, I did a rare thing --I  didn't overthink it in so far as how many different ways I could use it.  I just loved it on sight.  Okay, okay, here it is!  Some of you will think I've gone 'round the bend as they say, but I just love the possibilities of this die and the different "occasions" that it could be used for.  Here, take a look at the first card and then we'll discuss its possibilities:

Am I wrong in thinking that this die -- the screen door (screening comes with it!) and the cat (I added an additional cat inside the door) is great for things like "missing you", or "hello", perhaps "encouragement", or just plain old "thinking of you".  I'm sure there are more possibilities that I haven't mentioned.  You think about it and be sure and leave me a comment on it.  I'm all ears!

For this card I simply cut out an oblong the same size as the door from the face of the card, then using a grey Copic marker, I made lines indicating house siding on the front of the card.  I placed the screening in the door, made some hinges (which you can't see) and then punched two of the cats.  I assembled it all to represent the front of the house.  I meant to put a few small bushes beside the door -- maybe we'll do that in class this week.  If you haven't signed up yet, there are only a few openings left for this class on Wednesday nite at the Scrapbook Cupboard.

Now on to the second card.  After I punched the cats out, I realized I had some perfect negative space -- aha!  let's use that for a card as well.  Here's the result.


This is pretty self-explanatory with the exception of how the bow was done.  Using my Craft-Dee BowZ,  I made a double loop bow and attached it at the top.  You'll have to come to the class if you want to learn how this is done!

Call me crazy, but I really, really like the possibilities of this die.  Thanks for stopping by and be sure to leave a comment.
Ciao for now!

Ciao Bella!

Sunday, June 19, 2011

Another butterfly sighting!

I TOLD you I love butterflies!  I just got these incredible dies from Cheery Lynn Designs that are so intricate, but oh so easy to cut.  The butterflies come in two sizes with three dies to a package and you'll see a sample of each size on the following cards.  The other thing I recently purchased was two doilies from Cheery Lynn as well.  Doilies are very "hot" now and they really do lend themselves nicely to our card making needs.  So here's my sampling combining butterflies and doilies.

On this first card, I cut the doily from glossy CS and brayered over it using Kaleidescope ink.  I really like the variation of color that it shows.  On top of that I used the Daisy Flower from Spellbinders in two layers, inked the edges and on top of that I popped one of the small butterflies from Cheery Lynn all glittered up with Sparkle N Sprinkle glitter.


This next card shows what I call a "typical" doily - you know, the typical  pattern you find in the stores to dress up your baked goods for company.  It's a rather large doily so I decided to play with it a bit to fit onto a regular A2 size card and this is what I came up with.  The corner punch is one by Kreaxions (4 in 1 punch) and the butterfly is the large monarch from the new Cheery Lynn set.  


I simply creased the entire fan using my Scor-Buddy, cut a slit down one crease and fan folded the doily.  I then taped it to my card front and brushed on glue and glitter around the edges (you can't really tell by the picture - sorry). I then made a 3 loop bow with my E-Z BowZ bow making tool and attached it where all the fold lines meet, glittered up the monarch butterfly and added that as well.  

Well, let's see if my next card can be devoid of butterflies (probably not) as I'm having way too much fun with them.  By the way, you can take this class with me at the Scrapbook Cupboard on Friday, June 24th. 

Thanks for dropping by.  Ciao for now.
Ciao Bella!


Sunday, June 12, 2011

Flutter by butterfly

I think everyone enjoys butterflies.  There's something so calming and peaceful watching them flutter and alight, their wings softly catching the air as they gently land from leaf to flower.   Gee, I'm waxing poetic here!  Anyway, I love butterfly images, dies, etc.  This particular stamp by Outlines caught my eye and I just had to play with it.  Well 2 classes later (these were very popular projects at the Scrapbook Cupboard), so I decided I'd share them with you.

The first one is only a portion of the image.  I used Inka Gold Purple on the wings and restamped the wings and mounted them so they flutter.  I then colored the remainder of the image using Copics.  Adding a pretty scallop punch border at the bottom, some ribbon and pearls, and one card done!  Here it is.


The next card, as you can see, is the full image.  Again, I used Copics for coloring, pop dotted the wings and added glitter to all the butterflies and some leaves and flowers - just a touch, not too much.  This card is much prettier in person.  I tried to enhance the glitter, but I'm no great photographer for sure!  If you double click on any image, you will get a better idea.


Thanks for stopping by and I'm sure I'll have more posts during the week.
Ciao for now.
Ciao Bella!

Saturday, June 11, 2011

Back to the Punch Bunch

Here's hoping you are all well on this rather dark, dreary day -- just one in the many to follow, according to the weather forecasters.  So let's turn it into something a little more cheerful with these two cards.

Both these cards will be offered as a class next Thursday at the Scrapbook Cupboard.  I needed to shake things up a bit with some of our punches, so I took the large and small pear shape punches by Punch Bunch and created a totally new look (a rose or a pinecone is what you normally make with these punches).  Instead, I created something that looks more like a carnation on the card to the left.  If you've never used the pear shapes, then this will be an interesting class for you.  It just gives you another dimension.  Let's face it, punches can be expensive, so squeezing every ounce of versatility from them is paramount.

The card on the right was created using the tiger lily punch. Just by using different colored card stock with the tiger lily punch created a whole new dimension.  The center of the blue flower is made with the small sun punch.  I also used this delightful oval die that I picked up at the Heirloom Show in West Springfield.  And, of course, the E-Z BowZ bow maker was used to create the pretty, soft bows attached to each of the cards.


Additional punches used were a border punch from Martha Stewart and a 4-way punch from Kreaxions. I'm happy with the overall effect and love the soft, spring colors.

Well, that's it for today.  Be sure and hop on over to the E-Z BowZ blog to take a look at my invention!
Ciao for now.
Ciao Bella!