A while back a friend had emailed me and said she'd seen a contest to alter a paintbrush and thought of me. At that time I was over my head with projects so had to decline her suggestion. Last week Kept Creations decided to do their own altered paintbrush event and since I had a small window of time available, I thought I'd give it a go. Let me tell you how much fun it was! These things take on a life form of their own once you get going.
So here's my version of an altered paintbrush and I'll give you the scoop on some of the things I used and how I did it.
So here's my version of an altered paintbrush and I'll give you the scoop on some of the things I used and how I did it.
Now ain't she adorable in a twisted sort of way? LOL! Okay, maybe not. Anyway, to give you a rundown on how she was put together, I first took portions of her "hair" and tied them with ribbons. I covered the metal housing area of the paintbrush with neutral card stock, added a fringe of bangs to give it better balance and then started adding on. Now her eyelashes and mouth will surprise you -- they are made from the mustache dies that I showed on a previous post HERE. Don't ask me how I even thought of that one! I used the two smallest mustaches, one for her eyelashes and one for her mouth. Her earrings are made from buttons threaded thru wire.
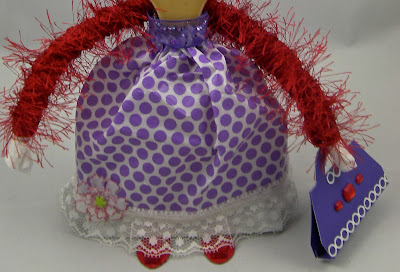
Her skirt is made from a piece of a Washi sheet with lace added to the hem. Th skirt was attached to the body by punching holes along the top of the skirt then ribbon was threaded thru the holes and tied in the back. I added a little flower at the bottom of her hem for a little pizzaz.
Her arms are simply a twisted up piece of paper towel wrapped in fringed yarn. This gal needed to stand up on her own, so I folded a piece of cardboard in half that was wide enough to fit under her skirt. I cut a hole in the center of the fold and pushed the paintbrush thru the hole and she stood up perfectly! But she needed shoes! So I traced a small plastic spoon twice, cut it out of cardboard, colored it in red and added a jewel to the toe of each shoe. The "shoes" were attached underneath the folded cardboard with tacky glue giving her more stability for standing. The final touch was a purse made from cardstock with jewels added for extra bling.
It's amazing what the mind can conjure up! Well I had fun with this and just thought I'd share. I understand our next challenge is a toilet paper roll. Hmmm....? I also suggested using the empty pods from the Keurig for another challenge. That could be interesting as well. I just hope I'm in a place and time to be able to participate in these challenges. What fun!
That's all for today. Ciao for now!
Ciao Bella!


